
Setting up a website based on Jekyll
In the previous post of the series we created and configured a devcontainer that will be used as environment to develop our website based on Jekyll.
In this post we will use Jekyll to create a new site, look at the basic configuration and explore the basics of a Jekyll-based website.
Scaffolding the site
Once Visual Studio Code has built and started our devcontainer, it’s time to dive into Jekyll.
The image we used to create the container already has everything installed so we can simply open the terminal built into Visual Studio Code to start.
If you are working from Windows like me, you can only use the Visual Studio Code terminal because we need to issue commands to Jekyll that is only available in the container.
If you know your way around with Docker, you should be able to open a terminal session from within the container.
By default, the terminal starts at the root folder of the workspace. This is where we want to create our Jekyll site.
We can do this by using the Jekyll CLI.
$ jekyll new .
The command above will create a new Jekyll site scaffold in current folder.
When the command is complete, the folder will contain all the needed item to start your website.
This includes some basic pages (the index, the 404, an about page and a sample post), the configuration files (_config.yml and Gemfile).
Spinning up the site for the first time
Now that the site has been scaffolded, it’s time to go give it a spin and see how it looks like.
The Jekyll CLI conveniently includes the necessary to serve a website after it has been built.
From the terminal, let’s execute the following command
$ bundle exec jekyll serve
You might have noticed that we don’t invoke the Jekyll CLI directly. This is because we leverage Bundler’s exec command to run jekyll serve in a context of the bundle specified in the Gemfile.
Running the command shown earlier will result in this output.
Configuration file: /workspaces/MyWebSite/_config.yml
            Source: /workspaces/MyWebSite
       Destination: /workspaces/MyWebSite/_site
 Incremental build: disabled. Enable with --incremental
      Generating...
       Jekyll Feed: Generating feed for posts
                    done in 0.271 seconds.
 Auto-regeneration: enabled for '/workspaces/MyWebSite'
    Server address: http://127.0.0.1:4000/
  Server running... press ctrl-c to stop.
As soon as the server is running, we can open the browser to navigate to the address specified in the terminal output to see our freshly generated site.
Here is a sneak peek.

Checking the generated site
Once the site has been generated, we can take a peek at the files generated by Jekyll by inspecting the _site folder.
The folder contains the build outputs that will be used by GitHub Pages for our site.
For example, we can see that there is no index.markdown file and there is a index.html file instead. If we look at the content of the second file, we will see that it includes the whole HTML code, not just the part specific for this page.
Here is the content of the _site folder generated from the source code of this site.
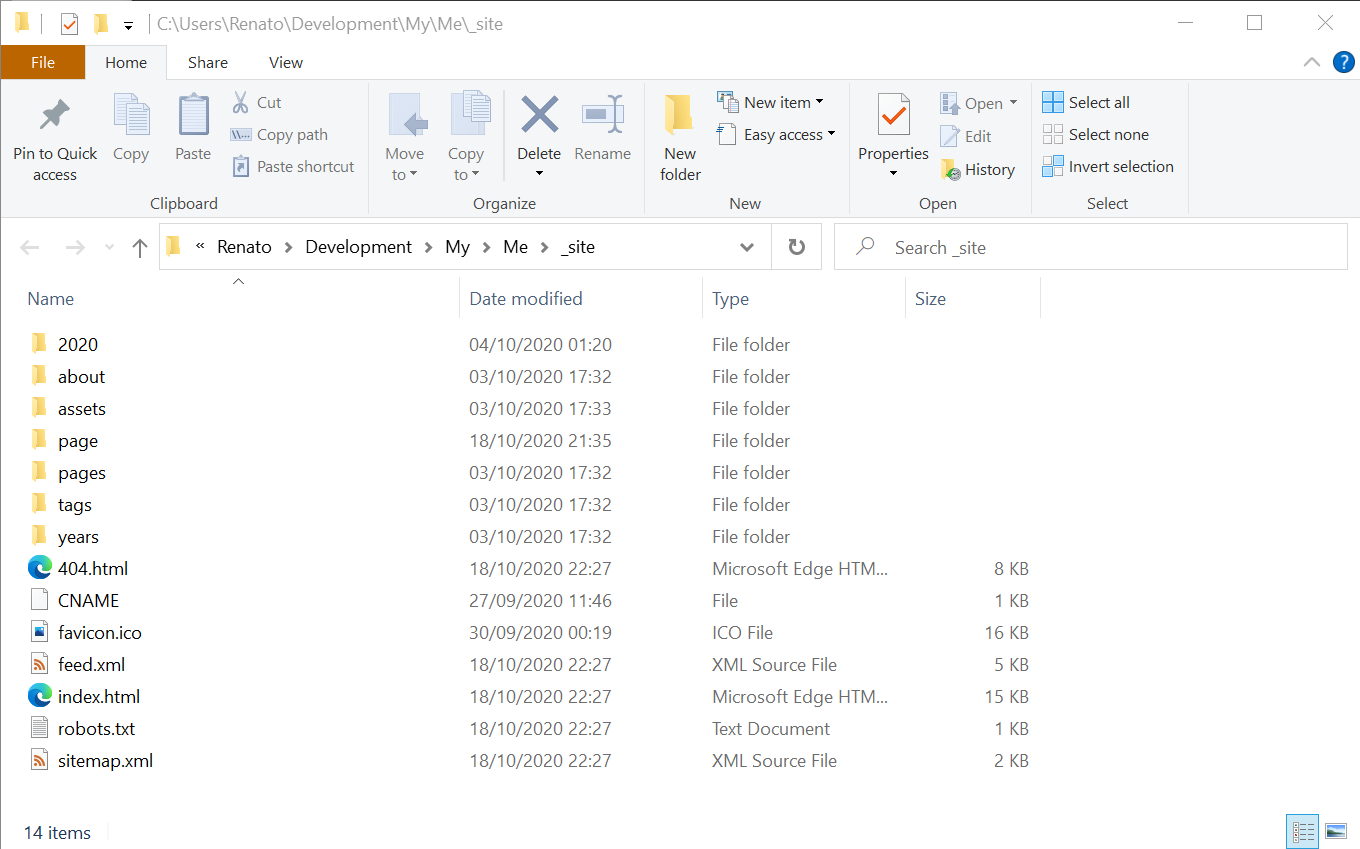
Please note that every file that is not explicitly excluded will be processed by Jekyll and copied into the _site folder, ready to be published.
Improving the development experience
The Jekyll CLI has several tricks up its sleeve to make the development experience sensibly better.
Auto-regeneration
While running, the serve command can keep track of changes on the filesystem and automatically trigger a new build.
Normally, you would just use the -w parameter but it seems to have some issues with Windows volumes.
Despite the container running Linux, the folder containing our workspace is a Windows drive mounted as a volume.
Luckily, the Jekyll CLI has a workaround for this issue.
By specifying the --force_polling parameter, we instruct serve to poll the filesystem for changes.
$ bundle exec jekyll serve --force_polling
Once the server has started, any modification in the workspace folder will trigger a new build and force Jekyll to serve the new version of the content.
This is the output I got in my terminal when I saved the file while writing this article
      Regenerating: 1 file(s) changed at 2020-10-18 19:44:47
                    _posts/2020-10-20-creating-this-blog-engine.md
      Remote Theme: Using theme kralizek/minimal-mistakes
       Jekyll Feed: Generating feed for posts
                    ...done in 8.5000052 seconds.
Once the terminal shows that the work is complete, I can simply hit F5 on my browser to get the latest version of my site.
Live Reload
The Jekyll CLI supports live reload. This means that we can instruct the serve command to force a page refresh on the browser as soon as a build is complete.
To enable this behavior, simply specify the --livereload parameter.
$ bundle exec jekyll serve --livereload
Putting all togheter
Using auto-regeneration and live reload together makes a very convenient way of working.
You edit your website in Visual Studio Code, hit save as often as you want and the browser is automatically refreshed to display the latest content.
$ bundle exec jekyll serve --livereload --force_polling
It’s just a bit annoying to put all those commands together every time we need to start serving the website.
A trick is to create a bash file to spare us from that long command.
- Create a new file in the root of the workspace called
serve.sh - Paste the content shown below
- Make the file executable (see below)
- Every time you start working on your site, simply run
./serve.sh
This is the content fo the serve.sh file:
#!/bin/bash
bundle exec jekyll serve --livereload --force_polling "$@"
As you can see, whenever I run the serve.sh script, I execute the serve command with both the --livereload and --force_polling flags.
Also, "$@" makes it so that if I were to pass any argument to the script, these would be forwarded to the serve command.
As it is right now, the serve.sh file will be available for download from you website. We will fix it soon!
For those not confident with the Linux Bash, here is the command needed to make our serve.sh script executable.
$ chmod +x serve.sh
Enabling the support for GitHub Pages
The site we just created does not have the support for GitHub Pages enabled.
To fix this, we will have to instruct the Ruby Bundler to load the correct set of packages.
Open the Gemfile and replace the line where Jekyll is explcitly referenced with the following one
gem "jekyll", "~> 4.1.1" # remove this one
gem "github-pages", group: :jekyll_plugins
Once the changes are saved, force bundle to install the packages.
To do so, you’ll need to stop serving the website by hitting ctrl+c in the terminal.
Then you can simply execute the following command.
$ bundle install
Updating the packages
If at a later time, you want to update the installed packages, you can do so by using the [update] command of Bundler.
$ bundle update
This command will try to update all installed packages (or gems in Ruby’s lingo) while respecting the version requirements of each package.
Customizing the configuration of Jekyll
The _config.yml file is the heart of every website built with Jekyll.
It includes all the settings to build the site and values that can be used in multiple pages.
This is the content of the _config.yml file generated by the scaffolding tool
title: Your awesome title
email: your-email@example.com
description: >- # this means to ignore newlines until "baseurl:"
  Write an awesome description for your new site here. You can edit this
  line in _config.yml. It will appear in your document head meta (for
  Google search results) and in your feed.xml site description.
baseurl: "" # the subpath of your site, e.g. /blog
url: "" # the base hostname & protocol for your site, e.g. http://example.com
twitter_username: jekyllrb
github_username:  jekyll

# Build settings
theme: minima
plugins:
  - jekyll-feed
By changing the content of this file, you can start customizing the title and the description of the website.
The basic file is particularly small because, when not specified, properties assume the value from the default configuration.
Let’s start customizing the setup of the website to our needs.
Excluding serve.sh from the site
Jekyll publishes by default all files, unless instructed otherwise.
This might create an issue for files that are convenient to have during development but should not be published, like the serve.sh script we created earlier.
We can modify the _config.yml so tha the serve.sh is excluded from the build process.
To do so, we have to uncomment the exclude section and append an entry for our file.
exclude:
  - .sass-cache/
  - .jekyll-cache/
  - gemfiles/
  - Gemfile
  - Gemfile.lock
  - node_modules/
  - vendor/bundle/
  - vendor/cache/
  - vendor/gems/
  - vendor/ruby/
  - serve.sh
To see the effects of this change, we need to restart our HTTP server, as per instructions contained in the _config.yml itself.
# For technical reasons, this file is *NOT* reloaded automatically when you use
# 'bundle exec jekyll serve'. If you change this file, please restart the server process.
Once we have restarted the server, we will see that our script is not present in the _site folder.
Creating a folder for standalone pages
Jekyll supports two basic type of content: pages and posts.
Posts are entries of a blog and live in the _posts folder.
Pages, on the other hand, can be placed everywhere and, if left unchecked, they can litter the whole workspace.
For this reason, it is usually suggested to create a _pages folder and use it to collect all pages.
Because Jekyll ignores folders whose name starts with an underscore, we need to signal Jekyll that we want the _pages folder to be processed.
For this purpose, we can add the following snippet to the _config.yml.
include:
  - _pages
This will instruct Jekyll to scan the _pages folder and process the files it contains.
Custom variables
The _config.yml can be used also to set custom variables that are visible in every page of the site.
A custom variable can be a simple boolean or a complex structure.
Here is a custom variable that represent the links available in the footer of this site.
footer:
  links:
    - label: "GitHub"
      icon: "fab fa-fw fa-github"
      url: "https://github.com/Kralizek"
    - label: "LinkedIn"
      icon: "fab fa-linkedin"
      url: "https://www.linkedin.com/in/renatogolia/"
    - label: "Twitter"
      icon: "fab fa-fw fa-twitter-square"
      url: "https://twitter.com/Kralizek"
    - label: "Stack Overflow"
      icon: "fab fa-fw fa-stack-overflow"
      url: "https://stackoverflow.com/users/82540"
Because this structure is defined in the _config.yml, it can be accessed from every page with the moniker site.footer.
Data files
When more and more variables are being added to the _config.yml file, it starts getting very cluttered and can make the overall editing experience less pleasing due to the continuous server restart.
A way to keep the configuration file as slim as possible is to use data files.
Data files are JSON, YAML or CSV files that are placed in the _data folder and are automatically parsed by Jekyll and made available as complex objects to all pages with the moniker site.data.[file-name-without-ext].
Here is an excerpt of the file _data/navigation.yml I use to sketch the menu structure of the about section.
about-me:
  - title: "About me"
    icon: "fas fa-info-circle"
    url: /about/
    children:
      - title: "Work experience"
        url: /about/work-experience/
      - title: "Accomplishments"
        url: /about/accomplishments/
      - title: "Suggested books"
        url: /about/books/
  - title: "Resume"
    icon: "far fa-fw fa-file-pdf"
    url: "/assets/files/resume-renato-golia.pdf"
When needed, I can use this object by accessing the variable site.data.navigation.about-me.
Front matter
Not requiring any backend database is probably one of the most important qualities of Jekyll because it makes it extremely convenient to work with.
Since there is no central database, the need for metadata for each piece of content is solved by decorating each page with a YAML header wrapped by triple-dashed lines. This header is often referred to as Front Matter.
The Front Matter can be used to set predefined variables or even create custom ones whose visibility is limited within the scope of the page.
This is the Front Matter I created for this page.
---
layout: single
title: "Creating this blog: Engine"
date: 2020-10-18 20:00
excerpt: "How I created this blog: how I created my site using Jekyll CLI and initial configuration"
tags: jekyll
toc: true
series: "Creating this blog"
---
Liquid templates
So far we have seen that we can place default and custom variables in the _config.yml, use data files for more complex data structures and leverage the Front Matter to store metadata of the pages.
Jekyll relies on the Liquid template language to customize how pages look and behave when building the site.
For example, in my Suggested books page, I use the script below to render the list of programming books I like. This list lies in a json file in the _data folder.
{% assign books = site.data.about-me.books | sort: "title" %}

<ul>
{% for book in books %}
    {% if book.read %}
    <li><strong><a href="{{ book.url }}">{{ book.title }}</a></strong> by {{ book.authors | join: ", " }}</li>
    {% endif %}
{% endfor %}
</ul>
Recap
In this post we have seen how to
- use the Jekyll CLI to scaffold a new site
- serve the website via a basic HTTP server
- configure the server to smooth our development process
- customize the scaffolded site to work on GitHub Pages
- customize the
_config.ymlfile - store and present data data in different ways
- use Liquid templates to bind different data fields to generate HTML
In the next post we will see how to consume and customize a theme like Minimal Mistakes.
Support this blog
If you liked this article, consider supporting this blog by buying me a pizza!